With the release of Emacs 30.1 on 23 Feb 2025, Android became one of the officially supported platforms. If you read my last post, you may recall that I’ve been using Obsidian lately. Actually, one of the main reasons I switched away from Emacs org-mode was the lack of an adequate mobile app. As a result, I moved over to Logseq first and later on to Obsidian.
Before switching, I tried to make it work with Orgzly, but I had some gripes with it. Namely, the following:
- Search didn’t consider file names
- Own Agenda with own syntax
- Every directory is a separate notebook
Those reasons ultimately made me switch to other solutions, but when I read that there is native Emacs support, I wanted to give it a shot.
There are already great posts out there on setting up Emacs on Android. Personally, I took a lot of guidance from Kristoffer Balintona’s post. But there were some points missing or not elaborated enough for me to get it running right away. This is why I also want to describe my journey. As the title suggests, this post focuses more on the aspect of bringing your existing Emacs configuration to Android and how to further tinker with your init.el for Android specifics. My main usage for Emacs on mobile is org-mode and org-roam, so I won’t go into detail on how to make it usable for programming.
With all that out of the way, let’s start with how we actually install Emacs on Android.
Installing Emacs on Android
There are actually multiple ways to install Emacs on Android, but only one is really feasible. Don’t just download Emacs from F-Droid or the main binaries from Sourceforge. With those approaches, Emacs won’t have access to any other CLI utilities. This becomes a problem very fast. For example, if you open a project file with C-x p <choose project> f and that project happens to be a git repository, the file search will crash because it can’t find a git executable.
Instead, I urge you to use the binaries from the Termux directory. These are binaries which have a shared user id to com.termux and Termux itself is signed with the Emacs signing key. What this means is that you will install a Termux environment along with Emacs and Emacs is allowed to use all the binaries that are installed within the Termux environment. So if you install CLI utilities like git, Emacs will be able to access them as well.
Termux is an Android terminal emulator and Linux environment app. Basically, it brings the shell environment to Android with a great package manager like those you are used to from your Linux desktop environment.
If you have Termux or Emacs installed already, you need to remove them before you install them from Sourceforge. Then you download the termux-app_apt-android-7-release_universal.apk from the Termux directory and install it. This was the first mistake I made, because I thought any Termux apk works with Emacs. So I just took Termux from F-Droid and tried to install the specifically signed Emacs apk. However, this will fail during the Emacs installation with a non-intuitive error like The app was not installed.
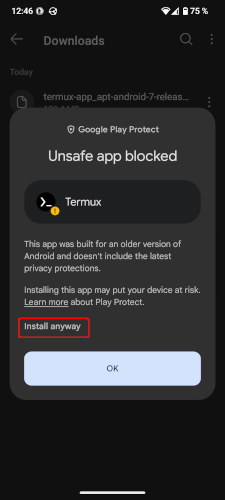
If you try to install these apps, you have to allow your browser to open these apk files to be able to install them. Afterwards, you will get Google Play Protect dialogues like this one. There is the almost hidden option of Install anyway, which you can click. I tried to show it inside of the red box in the next image.
Once you’ve installed Termux, you can install the correct Emacs apk for your Android version. There is a full list with descriptions at the top of the README, which tells you which apk you should download for your system. For example, I have a Fairphone 6 running on Android 15. Most smartphones nowadays run on ARM64. So the binary I had to download was emacs-30.2-29-arm64-v8a.apk. If you run on an Android version which is below 10, you should download emacs-30.2-21-arm64-v8a.apk instead. In any case, you should prefer the Emacs version 30.2 over 31.0.50 which is still a development release and can contain bugs. I tried 31.0.50 first and when I opened an org agenda, the agenda view lost focus and everything I did was only printed in the minibuffer. I had to turn off the screen and on again to make Emacs work again. However, this behavior didn’t exist in 30.2.
If you use Android 15
Something I stumbled upon when upgrading to Android 15 is that the Termux apk mentioned above doesn’t work anymore, because the signature it’s signed with isn’t valid for this Android version anymore. I downloaded the apk from this repository instead.
Welcome to your Terminal Emulator on a Phone
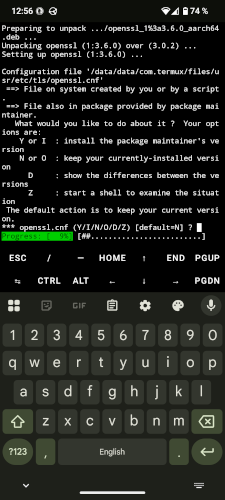
Now that we have installed both, you can continue by opening the Termux app. Termux has a great package manager called pkg, which allows you to deal with packages like you are used to on your Linux desktop. pkg search <search term> lets you search for packages and pkg install <package-name> lets you install packages. The thing we need to do now is bring all necessary packages to their newest version with pkg update && pkg upgrade. During the process, you will need to confirm some package installations by inputting y and pressing Enter/Return. You will also see a progress bar, similar to this screenshot:
 Once you are done with that, you can install any further packages here (or in Emacs shells), which you use with Emacs. For example, I use git a lot, so I also executed
 pkg install git. With org-mode, I also have flyspell enabled as a spell checker, which uses aspell as a backend. So I installed aspell itself via pkg install aspell and the English and German dictionaries via pkg install aspell-en and pkg install aspell-de respectively.
Install yourself an appropriate keyboard app
Before we open Emacs on Android for the first time, I really suggest switching to a virtual keyboard that has Ctrl, Alt, and maybe the arrow keys as separate keys. There are multiple apps out there which come with support for these keys. I decided to go with Unexpected Keyboard and will describe the process to set it up, but you can also go with any alternative of your liking and jump to the next section.
The special thing about Unexpected Keyboard is that it doesn’t have so many different layers, which you can reach via a specific button on your keyboard. Instead, if you swipe away from a button in a direction, you get an alternative key, instead of pressing the button. This requires a little bit of getting used to in the beginning, but once you get familiar with this mechanic, it feels quite fast to type in my opinion.
First, download Unexpected Keyboard from the Play Store. Once the download finishes, open it and go to its settings. You will see the following menu:

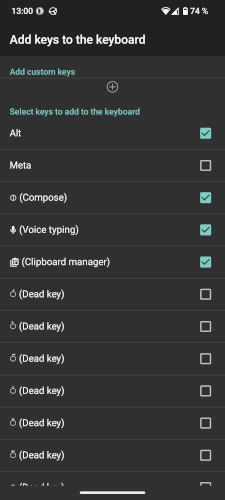
First, go to Add keys to the keyboard and check the Alt key so that it will be visible on your keyboard.
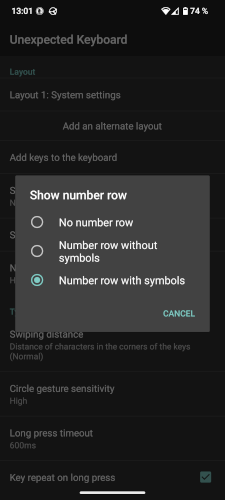
The second thing is to enable the number row at the top with symbols. For one, this allows us to execute window commands such as C-x <number> more quickly. The second point is that it allows us to have more special characters available as swipe-able options on the number keys.
With these settings, we are now good to open Emacs on Android for the first time.
Let Emacs know about Termux CLI utils
Once you open Emacs on Android, you should see the default experience, as shown in the following screenshot. Most likely you won’t have a virtual keyboard visible. To get one, you can click the white sheet with the magnifier and the pen, which I highlighted in the screenshot.

Now we need to create an early-init.el file in our .emacs.d which adds the Termux paths to the PATH variable and the exec-path. To do this, press C-x C-f for find-file and then type the path `~/.emacs.d/early-init.el` and press Return. Then copy the following code snippet:
(setenv "PATH" (format "%s:%s" "/data/data/com.termux/files/usr/bin"
               (getenv "PATH")))
(push "/data/data/com.termux/files/usr/bin" exec-path)
and paste it into Emacs with C-y. Then save the file with C-x C-s. Alternatively, you can also use the menu bar at the top. It should also offer actions for pasting and saving.
Now you can either restart the app or type M-x eval-buffer to evaluate the elisp code above.
To confirm if it worked, you can now open an eshell session or whatever shell you are used to by executing M-x eshell. In the shell, execute git version. If you see some version information, you are good to continue. If you see some error, restart the app and have a closer look at the early-init.el. Is the file path correct? Is the content similar?
Bring your Emacs Experience to Android
Now we have all the building blocks to bring our own config to the Android Emacs App. I have my system setup stored on GitHub at https://github.com/snowiow/snow. It’s a fully fledged Ansible setup, which I didn’t adapt for Android. So I will only bring the Emacs config over. If you store your Emacs config in another Git Forge, you should adapt the next steps to whatever you use. If you share your config through other means like Syncthing, skip to Sharing directories with the Emacs Sandbox, where I describe how I make my org notes available to Emacs on Android. You can use that mechanism for your Emacs config as well.
If you still have your eshell session open, you are good to go. Otherwise, open a new session for your preferred shell mode.
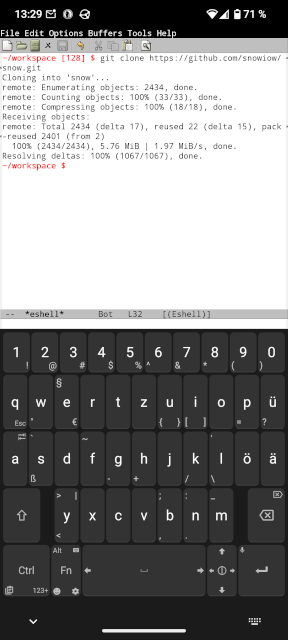
I usually create a separate subdirectory for all my git projects called workspace. There I clone my config repository.
Now symlink your config files to .emacs.d. In my case, my init.el, modeline files, snippets, and eshell folder live under roles/emacs/files. If you only have one init.el, just symlink that file. If you have multiple differently named files, symlink those as well. This is what I executed in eshell:
ln -s ~/workspace/snow/roles/emacs/files/init.el ~/.emacs.d/init.el
ln -s ~/workspace/snow/roles/emacs/files/modeline-dark.el ~/.emacs.d/modeline-dark.el
ln -s ~/workspace/snow/roles/emacs/files/modeline-light.el ~/.emacs.d/modeline-light.el
ln -s ~/workspace/snow/roles/emacs/files/snippets.el ~/.emacs.d/snippets
ln -s ~/workspace/snow/roles/emacs/files/eshell ~/.emacs.d/eshell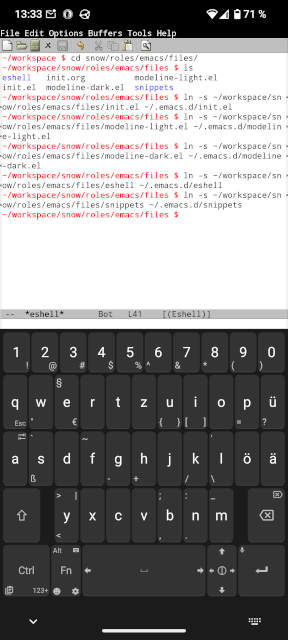
Once all your files are symlinked to the right spot, you can restart Emacs and on the next start it should download all packages and apply your configurations.
Make your config Android-aware
I recognized quickly that a lot of packages I use on my desktop are not really necessary on my phone. This is especially true because I mainly want to use it to interact with my org files. Some packages also rely on external dependencies like vterm, which compiles its own library. Oftentimes this doesn’t work within Android. Ignoring unused packages also saves startup time. So it’s a good thing to go through your config once more and decide what you really need.
To easily exclude packages from loading on Android, I wrote this small predicate function:
(defun not-android ()
  (not (eq system-type 'android)))
Now I can add the following to each use-package definition:
(use-package vterm
  :if (not-android)
  :config
  ...)
which will not load the package on Android, but on all other systems I use.
Sometimes I want to have different evaluation behavior between Android and my other systems. For example, I like to have the menu-bar-mode and tool-bar-mode activated on Android but not on my other systems. This can be accomplished with a simple if expression like the following:
(if (eq system-type 'android)
    (menu-bar-mode t)
  (menu-bar-mode -1))

(if (eq system-type 'android)
    (progn
      (tool-bar-mode t)
      (set-frame-parameter nil 'tool-bar-position 'bottom))
  (tool-bar-mode -1))
This enables both modes on Android only. For tool-bar-mode, I also want to have it at the bottom of the screen because it’s easier to reach. Sadly, a similar setting for menu-bar-mode doesn’t exist.
Sharing directories with the Emacs Sandbox
My org files are synced between all my devices through Syncthing. Since these files are stored outside of the sandbox where Emacs is installed, Emacs can’t access them initially. Instead, you need to grant access to paths explicitly. This is done by executing M-x android-request-directory-access. The file explorer you have installed will open and you can navigate to the path that you want to grant Emacs access to. This can look like the following screenshot where I give Emacs access to my notes directory within the Sync directory.
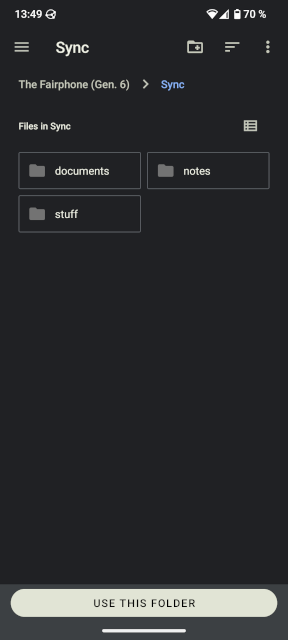 Once you are in the right folder, you can click
 Use this folder and Emacs will have access to it from then on under the path /content/storage. Giving access to this folder would make the following path accessible to Emacs /content/storage/com.android.externalstorage.documents/primary:Sync%2Fnotes.
Making org-mode work on Android
The only thing you should ensure is that you don’t have paths hardcoded too much into your config, but make heavy use of org-directory and org-roam-directory. Then you just set org-directory based on the current system similar to the config adjustments presented earlier. This is how I did it:
(defvar snow/android-notes-path "/content/storage/com.android.externalstorage.documents/primary:Sync%2Fnotes")
(defvar snow/notes-path "~/Sync/notes")

;; Set org-directory early so other packages can use it
(setq org-directory (if (eq system-type 'android)
                        snow/android-notes-path
                      snow/notes-path))
Map your volume buttons for quick access
The last thing I wanted to talk about is that Emacs by default intercepts the volume button presses. Either you disable it or you can map them to something you will use frequently on Android. For example, I mapped volume up to show my personal agenda for the day and volume down to open my shopping list:
(global-set-key (kbd "<volume-up>") (lambda () (interactive) (org-agenda nil "p")))
(global-set-key (kbd "<volume-down>") (lambda () (interactive) (find-file (concat org-roam-directory "/pages/shopping-list.org"))))
I assigned these two because those are the things I use the most and also want to access quickly when I’m on the road, not having the capacity to input complex Emacs chords.
When I want to read up on a note I made, I usually have the time to read it, so I also have the time to type C-c o r f and search for my org-roam note.
Improve performance when interacting with org-mode
One downside I discovered over time is that syncing my notes via Syncthing to a normal Android folder outside of the Emacs sandbox comes with some drawbacks:
- Agenda building is very slow (up to multiple minutes)
- Search commands like grep don’t find any files in that directory
To get around this, I installed Syncthing into the shared sandbox of Termux and Emacs. This works surprisingly well, similar to running Syncthing via a normal GUI app. Here is how you do it:
First install Syncthing inside of Termux:
pkg install syncthingThen you can run Syncthing by just executing the command in Termux:
syncthingThen your default browser app opens with the familiar web UI, where you can start trusting your other devices and sharing directories. The only problem is that you can’t do anything in that Termux session, because it’s running in the foreground. Sure, you can also spawn it into the background, but if Android decides to kill your Termux process, you have to reopen Termux and run the command again. It would be better to have it run as a real daemon process in the background and start automatically whenever Termux is opened. On normal Linux distributions you have a daemon runner like systemd. Termux also has one called termux-services. You can install it like this:
pkg install termux-servicesNow comes the slightly more complicated part: We need to define a service file, similar to systemd’s service files:
SV_DIR="$PREFIX/var/service/syncthing"
mkdir -p "$SV_DIR/log"
cat > "$SV_DIR/run" <<EOF
#!$PREFIX/bin/sh
exec syncthing --no-browser --gui-address=127.0.0.1:8385 2>&1
EOF
chmod +x "$SV_DIR/run"
ln -sf "$PREFIX/share/termux-services/svlogger" "$SV_DIR/log/run"
First, we create a variable called SV_DIR so that we don’t have to keep retyping the whole path on a mobile keyboard. The $PREFIX variable is a Termux-defined environment variable that points to /data/data/com.termux/files/usr. Then we create this directory and a subdirectory, where the logs of this service will be stored. Afterwards, we create the actual service file, which is always called run inside the service directory. It simply runs the syncthing binary, bound to a specific GUI address. You might notice that this is not the default address that Syncthing is using, which would be 8384. I personally had problems binding that address for whatever reason, so I chose the next one instead. Finally, the --no-browser flag tells Syncthing to not open the web GUI automatically. Once the file is created, we make it executable and symlink the default logger file into the log subdirectory, naming it run as well.
Next, we need to make sure that termux-services is always running on startup and that Syncthing also starts by default:
echo "source $PREFIX/etc/profile.d/start-services.sh" >> "$HOME/.bashrc"
source "$PREFIX/etc/profile.d/start-services.sh"

sv-enable syncthing
sv up syncthing
sv status syncthing
In this snippet, we put the start-services.sh shell script into our ~/.bashrc. This script comes with installing termux-services. This ensures that termux-services also starts every time Termux does. Then we start it for our current session in the next line. Then we enable syncthing, which is similar to the systemd enable command in that it will start automatically the next time Termux is opened. sv up starts it right now for our session. sv status syncthing tells us if it’s running successfully. If you see an error such as fail: syncthing: unable to change to service directory ..., restart Termux and check via sv status syncthing again. At least that solved it for me when I had the issue on one of my devices.
Finally, make sure to update the Android notes path in your Emacs config. For me, it now looks like this:
(defvar snow/android-notes-path "/data/data/com.termux/files/home/Sync/notes")Afterwards, you shouldn’t experience the same slowness as before. Also, you should now see results in your notes directory when doing grep searches.
Since this is quite some effort to set up again and again, I put my whole setup into a semi-idempotent shell script so that I don’t need to do everything manually if I need to set up Termux on a new Android phone again. Feel free to copy and modify it to your liking:
#!/data/data/com.termux/files/usr/bin/bash
# Run with:
#   bash mobile/termux-setup.sh

set -euo pipefail

WORKSPACE_DIR="$HOME/workspace"
REPO_DIR="$WORKSPACE_DIR/snow"
EMACS_FILES_DIR="$REPO_DIR/roles/emacs/files"
SYNCTHING_GUI_ADDRESS="127.0.0.1:8385"

log() { printf '\n\033[1;32m==> %s\033[0m\n' "$1"; }

log "Updating package lists and upgrading installed packages"
pkg update -y
pkg upgrade -y

log "Installing required packages"
pkg install -y git aspell aspell-en aspell-de ripgrep syncthing termux-services

log "Symlinking Emacs config files"
mkdir -p "$HOME/.emacs.d"
ln -sf "$EMACS_FILES_DIR/init.el" "$HOME/.emacs.d/init.el"
ln -sf "$EMACS_FILES_DIR/modeline-dark.el" "$HOME/.emacs.d/modeline-dark.el"
ln -sf "$EMACS_FILES_DIR/modeline-light.el" "$HOME/.emacs.d/modeline-light.el"
ln -sf "$EMACS_FILES_DIR/snippets.el" "$HOME/.emacs.d/snippets"
ln -sf "$EMACS_FILES_DIR/eshell" "$HOME/.emacs.d/eshell"

log "Writing early-init.el to expose Termux binaries to Emacs"
cat > "$HOME/.emacs.d/early-init.el" <<'EOF'
(setenv "PATH" (format "%s:%s" "/data/data/com.termux/files/usr/bin"
                       (getenv "PATH")))
(push "/data/data/com.termux/files/usr/bin" exec-path)
EOF

log "Setting up Syncthing as a termux-services runit service"
SV_DIR="$PREFIX/var/service/syncthing"
mkdir -p "$SV_DIR/log"
cat > "$SV_DIR/run" <<EOF
#!$PREFIX/bin/sh
exec syncthing --no-browser --gui-address=$SYNCTHING_GUI_ADDRESS 2>&1
EOF
chmod +x "$SV_DIR/run"
ln -sf "$PREFIX/share/termux-services/svlogger" "$SV_DIR/log/run"

log "Ensuring termux-services is sourced on every Termux startup"
STARTUP_LINE='source $PREFIX/etc/profile.d/start-services.sh'
if ! grep -qF "$STARTUP_LINE" "$HOME/.bashrc" 2>/dev/null; then
  echo "$STARTUP_LINE" >> "$HOME/.bashrc"
fi
# shellcheck disable=SC1091
source "$PREFIX/etc/profile.d/start-services.sh"

log "Enabling and starting the syncthing service"
sv-enable syncthing
sv up syncthing
sleep 1
sv status syncthing

log "Done! Syncthing is now running under $SYNCTHING_GUI_ADDRESS"
Final Words
First of all, thanks for getting this far. I hope you could take something usable for yourself from this post. Also, a big thanks to Kristoffer Balintona and his blog post, which gave me a lot of inspiration and guidance to test Emacs on Android myself.
For the few use cases I have, the setup feels reliable, but since I’m only getting started, I don’t feel qualified to give a recommendation whether this is a 100% better experience than other dedicated org-mode Android apps out there. Maybe I will add a conclusion in a few months, once I have gained more experience.
For more information on the topic, also read the official GNU Emacs Android manual. It is especially helpful on the topic of accessing external files.
Finally, if you want to check out my current config, you can find it here.
Later updates
- 12.07.2026: Added a note to download an alternative apk, because the one on Sourceforge doesn’t work on Android 15.
- 12.07.2026: Added new Syncthing approach by running it in Termux instead of natively.